
We will be hopping for three days from the 2nd through the 4th of Dec. Some of the ladies in the hop will offering Candy so look out for those neat gifts...also make sure you become my follower and comment all 3 days of the hop on all the participating blogs in order to win the Candy Elsa will be giving away on her blog.
We hope to inspire you to create and give homemade gifts and cards this year. If you arrived here by chance please go back to the beginning.
My project today is super simple. I made a photo holder.( I will also have video on my YOUTUBE channel later today for your convenience - cause I like ya, lol)
So, my mother in law is forever (and a day) asking for photos of her grand babies..I used to get them developed and give them right to her in the envelope provided. These days I get them printed online and shipped. So I have been just throwing them in whatever I can find and giving it to her that way. Now we as scrappers can't go out like that, right? So why not make you own?? These are great gift ideas for grandparents, aunts, uncles, or whoever wants pics of your little ones. As an added bonus, you handmade and embellished it! Who can ask for a more creative and personal gift?
This is what I came up with (there will be a video tutorial on this if it seems confusing):

and this one:

I absolutely love it!! I definately will be making more. Here's how you can do it!
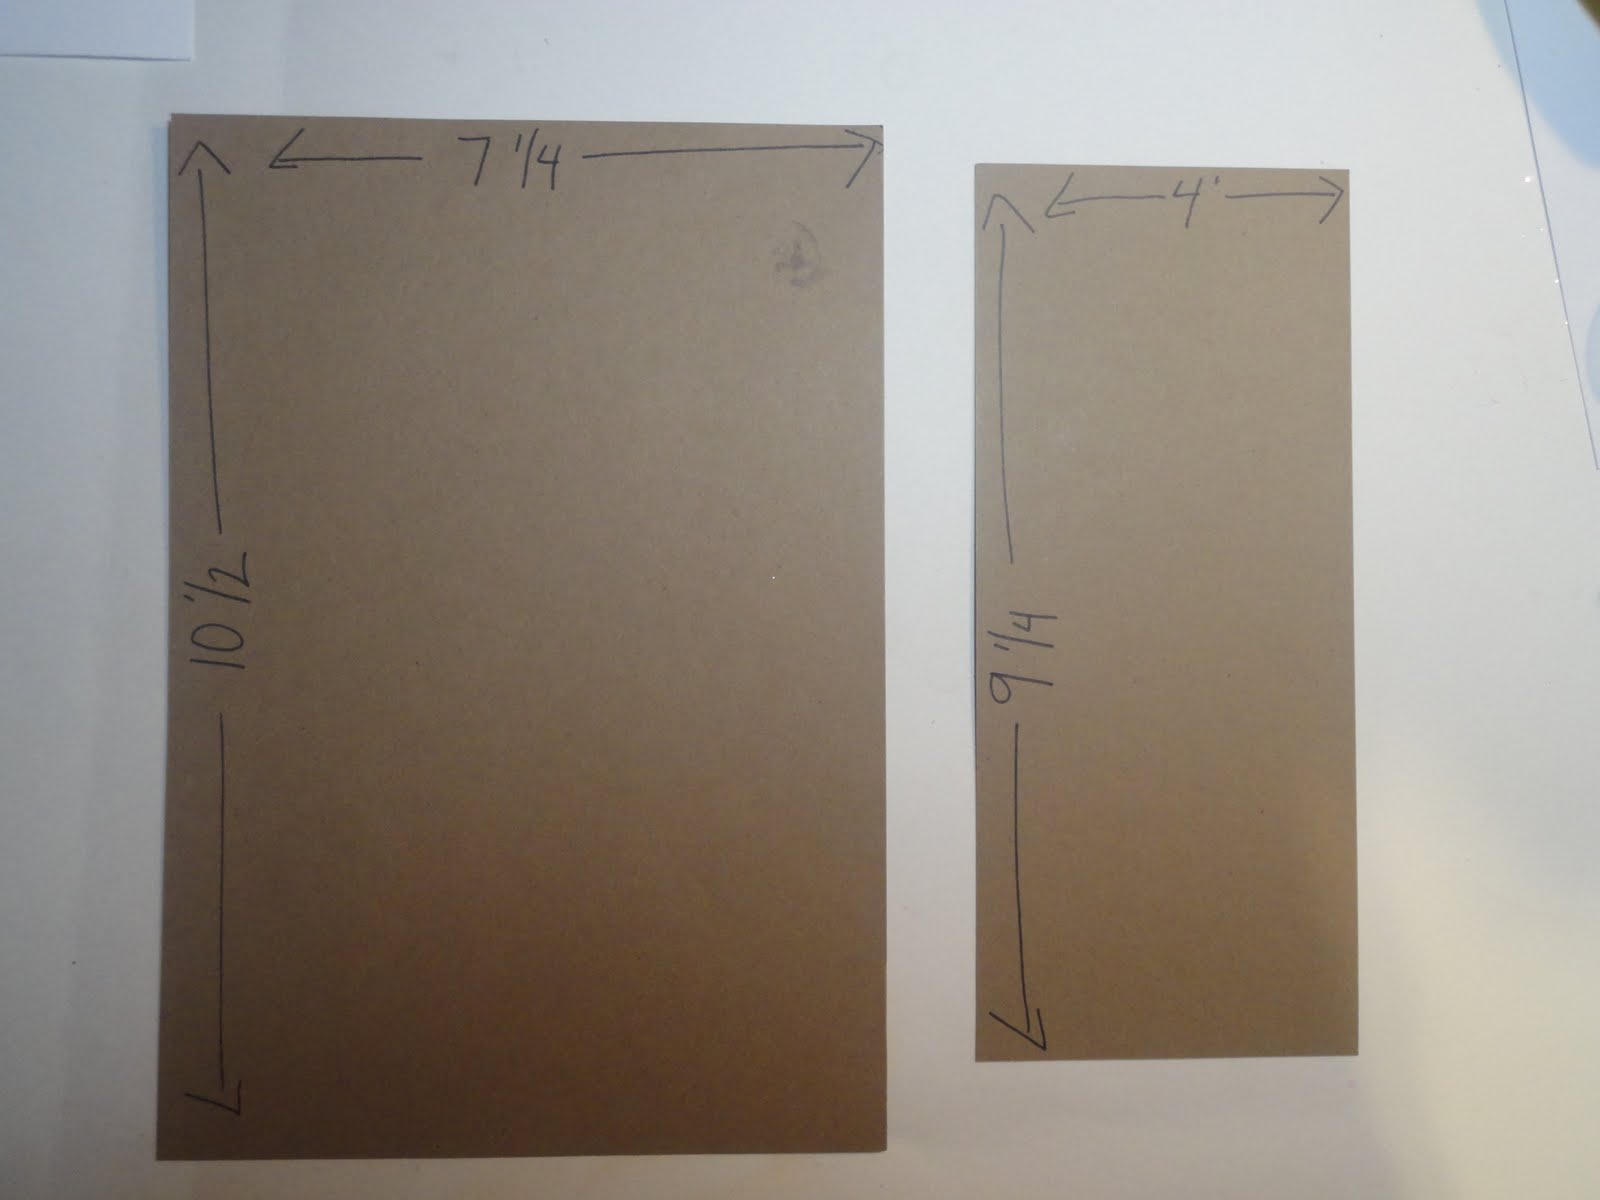
You'll need your base cut in two different sizes. One at 10 1/2 by 7 1/4 and one at 9 1/4 by 4:
Next the scoring starts. Take the bigger piece (10 1/2 by 7 1/4) and place the long way on the score board. Starting from left to right score at: 4 1/2, 5, 9 1/2 and 10. It should look like this:

The second piece (9 1/4 by 4) and score on the long side from left to right at: 1/2, 1, 8 1/4 and 8 3/4. It should look like this:

Now add score or double sided tape to the underside of the short piece. Just on the first 1/2" line. This will connect the two pieces together. Like so:

Now connect the two pieces. The bottom 1/2" of the short piece, connects to the bottom of the top piece. Like this:

Now you can add more double sided tape to the flaps. Like this:

To complete the photo holder..attach both side to the base. Like so:

All that's left is to mat your paper!! Voila! The demensions for the matting are as follows:
Front top (what every see's first), front inside ( what you see at the top when you flip it open) and back are the same size at: 7 1/4 by 4 1/2.
Front bottom is 7 1/4 by 4
Strips on top and bottom are 1/2 by 7 1/4.
Have fun with this! Don't forget to leave a comment!
Thanks for stopping by and please hop on to Suzie....
Here is the line up...
Elsa- http://www.JustaFewDesigns.blogspot.com/
Krystal http://www.krystalsnight.blogspot.com/
Jules -www.thejulebox.com
Kimi - http://uniquescrappiness.blogspot.com/
Linda -http://simpleandsassycreations.blogspot.com/
Margaret- http://www.auntmargaretdesigns.blogspot.com/
Stacie- http:// www.creativyou.blogspot.com
Michelle- http://creativeoperation.blogspot.com/
Tmika - http://www.scrapdaworld.blogspot.com/ (you are here)
Sue - http://scrappingsuzieqtt.blogspot.com/
Yolanda - http://socrafty3.blogspot.com/
Emily- http://www.createserendipity.net/
oh girly this is sweeet! project plus a tutorial! wow...awesome...thanks for hopping with me!!
ReplyDeletexoxoxo
Elsa
So pretty ! Love it!
ReplyDeleteNothing but Love*
Krystal
I am making one!
ReplyDeleteMichelle
Tmika!!! Cute idea and so easy to make! Great idea. TFS. Hope your holiday season is wonderfully blessed!
ReplyDeleteHi Tmika! I just love your projects ad these one looks amazingly simple! I will sure try to do one! Hope mine turns out as cuuuute as yours!LOL...Kisses from Brazil! biancasimas
ReplyDeleteLove it. Thanks for sharing
ReplyDeleteAww thats a great idea!...
ReplyDeleteLove ur project!...
Plus step by step pics,
thanx a bunch for the vid tutorial also!... =)
Hugz,
ღ ∫ℓ∂ηℓttℓ ღ
Aloha Tmika! What an awesome gift this will be! Great idea - wish I thought of it! TFS and see you tomorrow! xoxo!
ReplyDeleteLOVE this idea Tmika! Thanks for the tutorial - going to check out the video later today after I finish hopping :)
ReplyDeleterebeccadunham at hotmail dot com
Thanks for sharing your wonderful idea!! Cant wait to try it out.
ReplyDeleteGreat gift idea!
ReplyDeleteFlaCrafter
What a great way of presenting photos. Thanks for sharing!
ReplyDeletegreat to meet u , I didn't sign in at all yest so just found the hop this am, I hope I can still be involved, if not se labor I found u and ur creations, yay! nice to meet u I'm on mas as well , deb
ReplyDeleteLove that idea. You're right, these makes great gifts. Thanks for sharing, Johanne L.
ReplyDeleteAnother great idea!
ReplyDeleteThis is so perfect! I have to send pictures back home, and to have such a beautiful way to send them, is so perfect! Totally perfect!! LOL! Did I mention I think this a PERFECT project! TFS! I truly mean Thank You!
ReplyDeleteSo beautiful project Tmika!! Thanks for sharing! Love it! Hugs.. Maggy :)
ReplyDeleteI agree that this is a great way to carry Ur pictures of Ur family to events to share with luved ones! TfS this great idea, Timika! HuGs, Valerie G
ReplyDeleteIdeal gift for a grandparent or relative. Thanks so much for sharing.
ReplyDeletelove these ideas, thanks so much, will be trying it soon.
ReplyDelete